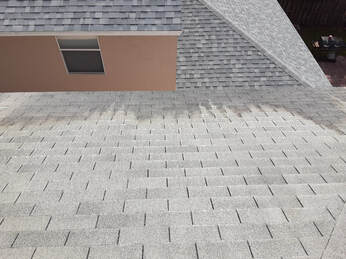
 You may have noticed after months of rain and exposure to the sunlight your tile roof shingle may collect a dark hue. At first sight they seem like black streaks coming from the roof. From top to bottom. Although not easily seems from the ground, this is organic growth on the tiles. Brought on by the warm climate and many days of an undisturbed habitat. The most common growth found on roof tiles is called "Gloeocapsa magma" also found in an article by classic metal roofings https://www.classicmetalroofingsystems.com/theres-fungus-among-us/ . What Gleocapsma Magma is are a form of algae literally feeding off your composition shingles, the only way the human eye can capture this infestation is by a black staining on the roofs surface. At a microscopic level they are mold spores that have th eability to travel through the air and attach to other parts of your homes surfaces. Other home surfaces may include wood fences, stucco, windows and so on. Not only does this algae look unsightly but it can also drive down your homes value. When selling your home keeping it clean before the sell is a big plus. Soft washing and pressure cleaning your homes concrete and roof are small ways that make a big difference in curb appeal to your homes value. How to clean your tile roof shingles Step by Step The following steps will be broken down from start to finish. Goal, Preparation, Protection, Application, Dilution, Touch Ups and Rinse. Step 1: First we must take a look at what is our main objective. Is it cleaning a asphalt tile roof or is it cleaning a barrel tile roof. Knowing what surface you plan to clean in the biggest step in how we plan to tackle a job. In this example we will use asphalt shingle tile roof. Step 2: Secondly we want to prepare all tools and cleaning solutions required by our specific task. If we are working on a roof we will be needing a ladder, ladder stabilizers, safety harnesses, safety goggles and a chemical respirator mask. To apply the cleaning solution it comes down to your own choice. The cleaner can be applied by backpack sprayer,12 volt electrical pump or other form of a pump. The important part in this step is to get an even coat on your surface to prevent runoff into surrounding vegetation and landscape. The best cleaning solution to use for a roof cleaning is sodium hypochlorite. This with a mixture of water for dilution and surfactants to help cling (allowing the cleaner to do its work) will bring out the most desired cleaning effect. Step 3: Next we have protection. Protection does not only include plant protection but also property protection, bodily protection and equipment protection. For plant protection we have a few strategies that can be applied. We can place a breathable tarp over sensitive plants or if potted we can move away from the cleaning area. The method we like to use best is dilution with water. The method starts with watering the landscape with water before, during and after. This way the plant is well hydrated throughout the chemical application. Even if a gallon of chemical runs off into a plant it can be kept hydrated with many gallons of water more to dilute the cleaner to cancel out its effects. Property protection involves taping over exposed electrical outlets to avoid overspray getting into the power supply and short circuiting. Moving and also tarping outdoor furniture that can be stained with the chemical. Up next in line we have bodily protection, this includes safety goggle or sunglasses that cover your whole eye area, chemical respirator, long sleeve clothes and a batch of clean water to rinse yourself off in the case of a chemical overspray directly on your person. Although sometimes forgotten equipment protection also plays a key role in saving its use for the next cleaning project. Equipment such as pumps and sprayers should be rinsed out thoroughly with clean water and if possible a bleach neutralizer to level out the Ph. If your equipment is left untreated it will only last all but a couple jobs. Step 4: The next step involves application of the chemical on the desired surface of cleaning. We prefer to use a spray tip that achieves a clean thick enough coat to kill any organic growth with the first and if needed second coat. The cleaner works systematically attacking the bacteria's roots therefore it should be left on and only rinsed off by the rainstorms to come. Step 5: "Dilution is the solution to pollution" That is right dilution solves most of the damage the chemical can cause if not properly used and applied. Dilution the landscape with fresh clean water can cancel the cleaners concentration leaving us with a concentration less than pool water. Step 6: Touch ups on the areas not cleaned up enough will require a light 3rd coat. If there is a small brown haze this is not an issue as the organic growth will be working within its roots for the next days to come. The black stains go from black to brown then disappear. "If its brown it will come down" In this situation we need to trust the process. Step 7: The final step once all the roof is cleaned is to rinse, rinse, rinse and rinse some more! While rinsing down plants to dilute its concentration you must rinse your equipment and tools to prevent corrosion. In certain circumstance if a roof does not have rainstorm gutters it is a good practice to rinse about 3 feet up. This way when it rains the plants wont get a direct concentration. For more information on soft washing please visit our website ivanspressurecleaning.com or call/ text us at (561)305-8154 Visit our facebook page! Comments are closed.
|
AuthorWrite something about yourself. No need to be fancy, just an overview. Archives
April 2022
Categories |
We invite you to contact us For a Free Estimate.
|
Copyright 2021.
Ivan's Pressure Cleaning. All Rights Reserved. Website Management by
Creative Web Advisors, Inc. |
